Thursday, 25 December 2008

Roof party


Christmas day arrived with the transformation of the inside into a party venue for 26 friends and family. Timber slabs and spare Timbercrete blocks where the basis for the table which was set in fine splendor. Much food and merriment was had and the roof was officially wetted :-) 

Tuesday, 2 December 2008

Roofing


At the end of day 2. I found framing at 45 degree pitch fun, but roofing on the 45 is bloody tricky to say the least!
I have coverted the truck into a mobile scaffold - very handy.

Friday, 28 November 2008

Framing inspection


The day has arrived, at last, for the framing inspection. I really had little idea what it would take to get to this point as to the effort (work) required. Needless to say, it was lots! Aside from the heavy timber frame, there is some 1500m of "stick framing" for the rafters, purlis and gable end wall framing, more than 8000 nails along with numerous metal fastenings, bolts etc. The build inspection was passed without a hitch, so the roof can now go on... 

Saturday, 1 November 2008

Roof framing


The upper story is starting to take shape. Figuring out the compound angles and rafter lengths for the dormer structures has made my head hurt. While the trigonometry is reasonably straight forward, putting it into practice is another thing. Two or three millimetres can make the difference between a good fit and the timber being cut too short!
Check out hip roof models and calculations here.


Tuesday, 14 October 2008

Stage 2 - level 1 frame assembly


I am very pleased indeed. The pre-cut timber frame elements all  fit. Measuring 27 times and cutting once has paid off! The 8 main columns, 6 roof beams & 4 tie beams are all in place, square and pegged together.  All that is left to do now is to fit the king posts atop the tie beams and install the ridge beams. The large domer window frames, which I was not confident enough to pre-cut will come next.

Saturday, 4 October 2008

Stage 1 - Rafters over living room


The plan is to get the living room rain proof and the tmber frame protected from the elements. This will provide a dryish storage area and work space while the main level 1 frame and roof is constructed. Today I finished the roof structure over the vaulted living room. 

Monday, 29 September 2008

Assembly


Assembling the upper floor and roof frame begins. Starting with the living room;  the arch between the columns supporting the roof beams and framing the picture window spans 2.5 metres. So far all the bits of the wooden puzzle fit together (touch wood ;-).
The ridge beam in the living room is 5.4 metres off the floor. The tractor crane lifts the timbers onto the roof and from there they are man
 handled into position across the scafold. Spring weather brings
 more fine days than  wet now, but I am looking forward to the roof going on.

Saturday, 20 September 2008

The beamery


The daily routine consists of making large piles on saw dust, wood shavings and hopefully a couple of finished timber beams. The pile of completed columns and beams for the upper floor and roof structure is slowly growing.

Thursday, 28 August 2008

Milestone

The floor is on.
A few consecutive days of fine weather gave me the opportunity to complete the ground floor frame, build the floor joists and place the plywood floor.
The plywood floor is a large bracing diaphram and will be eventually covered with a solid wood flooring. A conventional ceiling will be installed under the joists; either timber sarking or plastered gib board. I was pleased to discover that the original building lines at the floor level are within +/- 5mm and  floor square and  level!


Thursday, 14 August 2008

Ground floor frame

Two fine days in the last two weeks!!! Work proceeds slowly between frequent rain showers and hail storms. No let up forecasted :-(
The Timbercrete walls provide much of the load bearing sructure for the upper storey and roof. The ground floor frame provides support in the central section of the building and is married into the Timbercrete structure. This hybird structure is  somewhat novel, so lots of tea breaks and some head scratching required. The tractor FEL boom extension is taking care of all the heavy lifting and is nifty enough to drive around "inside".   I'm pretty happy with the way my first timber peg joints are coming together. I have discovered that the tenon holes can be offset by as much as 4mm and drawn in by a heavy hammer and tappered peg end.


Tuesday, 29 July 2008

Still raining, with at least another 5 days of nasty weather to come.
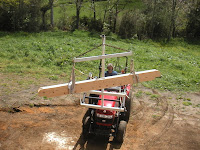
The timber work continues. The learning curve is pretty steep, but I'm enjoying the process. These 3 pics show some of the tools, systems and  design employed. The beetle (mallet) was made from a gum log. Initally 10kgs , but proved to be a bit heavy, so cut it down to about 6kgs and now does the job nicely. The 2500kg truck tiedown is just the trick for pulling the joints together tightly. The inlay around the post top will feature the top of stair case banister post. I purchased a Makita chain mortiser which makes short work of the mortise joint. Tenons are cut carefully with a circular saw and hand saw. I'm learning the art of keeping a keen edge on the chisel.
The wooden pegs arrived today from Log Home Store in the US. Ideally I would have sourced the hardwood pegs locally, but that had its challenges. An internet search and on-line purchase took just 5 days form order to delivery; both economical and efficient. As I had pre-drilled 25mm holes in a number of beams, I was very pleased to discover that the pegs fit my holes perfectly.
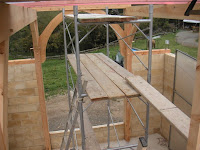

Sunday, 27 July 2008

Confined to the beamery

We are definitely in the grip of winter now. The open sided barn has been converted into a beamery which keeps most of the weather out most of the time. 
I'm using a shouldered mortise & tenon for the tie beam to post joint, with a simple, but wider mortise & tenon joint above for the floor beam post joint. A simple dovetail mortise will secure the lower portion of the intermediate floor beams.

Friday, 18 July 2008

Milling beams


Locally sourced Lawson Cyprus trees where used. The majority of the milling took place on site over the summer producing about 10 cubic metres of columns and beams along with another 3 or 4 cubic metres of smaller dimension timbers. 
Top plate/bond beams are 200 x 100, columns are 200 x 150, floor beams are 250 x 150 and roof and tie beams are either 200 x 150 or 250 x 150 size timbers. 
The Rimu Mill  turns out some impressive Macrocarpa slabes.